A project is the local folder that gives a request its working scope. Its team, settings, connections, layout, and history belong to that project. A request is a user goal. Vopit turns that goal into tickets and workflow stages; these are not the same thing as a chat message or a git branch.
Create a useful request
- Open or change the project before submitting the request. Stop active requests and finish pending workspace changes before switching projects.
- After selecting a new project, create or import its team if prompted. Vopit then reloads that project’s team, settings, and history.
- State the desired result, constraints, and how to verify it. Keep the request self-contained; a request can contain up to 20,000 characters.
- Use Enter to submit and Shift+Enter for a line break. Attach files with the paperclip, drop them on the message box, or paste them with Ctrl+V (Command+V on macOS). Images (PNG, JPEG, GIF or WebP, up to six of 5 MB each) are shown to every stage of the request, whatever its connection. A text file up to 100,000 bytes is read into the request, up to eight. Any other file (an archive, a spreadsheet, a PDF, a large CSV…), up to eight of 25 MB each, is saved in the project’s .vopit-attachments folder: each stage is told where it is and opens it with its own tools, for example to unzip it or read it with a script. The folder keeps itself out of Git and out of the agents’ file listings.
- The enabled coordinator selects relevant teammates from the request and their capabilities. Watch assigned tickets, handoffs, tool activity, and result evidence in the request view.
Operate the studio
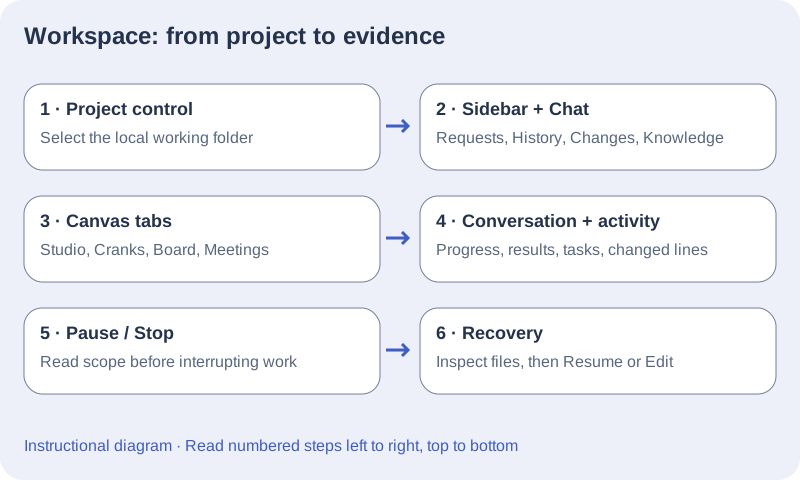
- The tabs above the canvas switch between Studio (the agents’ floor), Cranks, Board and Meetings. The project sidebar has Requests, History, Changes (source control) and Knowledge tabs.
- Two layouts are available, chosen with the layout button in the header, in Settings > Appearance, or with Quick actions; the choice is kept on this computer. The Studio view (the default) puts the agents’ floor in the middle with the chat, the conversation and the activity below it. The Pro view is conversation first: New request, the views (Conversation, Studio, Board, Meetings, Cranks) and the project sidebar on the left; the selected request’s conversation and the composer in the middle; on the right, a Details panel with the request’s live activity, tasks and modified files, or the team. Show or hide Details with the header button or Quick actions. Opening a request from anywhere shows its conversation.
- The workspace can be panned and zoomed; drag workstations and furniture to arrange the visual floor. Those layout preferences do not alter an agent’s capabilities.
- Quick actions (Ctrl+K, or Cmd+K on macOS) searches requests, board cards, agents, Cranks and meetings, runs workspace actions, or sends the typed text as a new request. Appearance defaults to light and also supports dark, system and balanced modes with a contrasting canvas.
- Pause all in the header prevents new progress until Resume all; Quick actions offers the same control as Pause agents / Resume agents. Stop affects the selected request; Stop all requests applies to every active request. Whistle is a visual interaction, not a work-control action.
- The speed mode switch in the header chooses Ultra-fast, Balanced or Big brain (the default) for the whole team. Requests of the same project can also run in parallel, each in its own Git worktree. See Speed modes and parallel requests.
Edit, fix, or run a request again
- Choose Edit on the request message. A request that is still queued and has never started is edited in place; choose Save. A finished, failed or stopped request is not modified: Run edited request starts a new request with the new text, and the original stays in History. Stop a running request before editing it.
- A completed request shows Run again, which starts the same text as a new request.
- When a request ends with “Almost there · open points remain.”, the team delivered its work but no later stage resolved the listed Open points. Fix open points (Fix in the request list) asks the team to handle only those points in a new request; existing files stay in place.
- Quick actions offers the same commands for the selected request: edit it, run it again, resume it, fix its open points, export it or stop it.
Resume instead of repeating blindly
Failed, cancelled, and partial requests show a recovery banner with Resume request, Restart and Edit and restart. Resume retains the session, project, attachments, recorded results, and completed stages where available; a partial request whose review budget ran out continues the pending corrections with a fresh review budget. Restart and Edit and restart create a new request. Inspect files before allowing a resumed stage to rerun a command or edit. App restart preserves completed stage records in SQLite, but an interrupted stage uses the current connection settings when it resumes.
Work on several projects at once
Each Vopit window works on its own project, with its own team, history, Board, Cranks and meetings. Open as many windows as you need: requests keep running in each of them. Open a project… still changes the project of the current window.
- Project → New window (Ctrl+Shift+N) opens another Vopit window. Choose its project as usual.
- In Project → Open recent, the icon at the right of a project opens it directly in a new window.
- A project is never open twice. A project open in another window is marked Other window; choosing it brings that window to the front.
- The settings of this computer, your account and the recent projects are shared by every window. Starting Vopit again brings the first window to the front.
- The vopit command follows the same rule: it reaches the Vopit that has the project of the current folder open, or starts its own engine, and never moves another window to its project. vopit instances lists every Vopit running on this computer.
- With Remote turned on, every window and terminal engine of this computer appears in the phone web app; see Remote: control Vopit from your phone.
- Speed modes and parallel requests
- Plan work on the Board
- Hold meetings with your agents
- Remote: control Vopit from your phone
Verify project scope before work begins
- Use the Project control in the top bar or Open project in Quick actions. Select the intended local folder.
- For a new project, choose how to start: Create your team with AI (Build my studio) proposes a team fitted to your brief and project; Create a base team (Create team) adds the native team; Import a team (Import team) loads a file, another project or the previous workspace. In the native team, Orchestrator, Planner, Researcher, Developer and Reviewer start enabled; UI/UX Designer, Documentator, DevOps, Ticketer and Git Manager start disabled. Settings → Studio also provides recovery from a previous or selected project.
- Confirm the folder name in the top bar and inspect its full path using the control’s tooltip. Ensure the folder contains the files that the task should modify.
- Start with a read-only request to identify the relevant files and test command. Review READ/EXECUTE approvals against that folder.
- If you selected the wrong folder, stop the request and inspect any changes before opening another project and submitting corrected work. Changing the project selector does not undo a running request’s edits.
Read the conversation and live workbench
- Use Requests for current work, History for finished requests, Changes for the project’s source control (see Linked folders and source control), and Knowledge for the project’s saved memory and execution records.
- Compose a request in Chat. Conversation & results shows public progress and delivered results, with agent portraits and color accents. Team updates stay compact. Switch the filter from All updates to Results only, use Show earlier updates to read older entries, or open the conversation in large view (Escape returns).
- The adjacent panel switches between Live activity, Tasks and Modified files. Live activity shows each agent’s latest activity, with recent updates moving to the top.
- Modified files shows added and removed line counts when available. An unavailable count is not zero; partial counts are marked. Inspect the actual files or diff before accepting the changes.
- Switch between the four canvases above the scene: Studio, Cranks, Board and Meetings. Open your initials at the top right to reach Settings → Account.